How to Install Shocks and Springs
By Rob Robinette
Rear Shocks & Springs
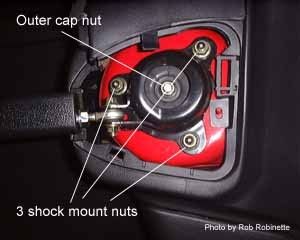
Remove all four nuts from the shock
tower
Remove the shock tower cover by popping up the rear of the cover
with your fingers. Remove all four 14mm nuts (see photo). I left the strut tower brace in
place, it doesn't need to come off.
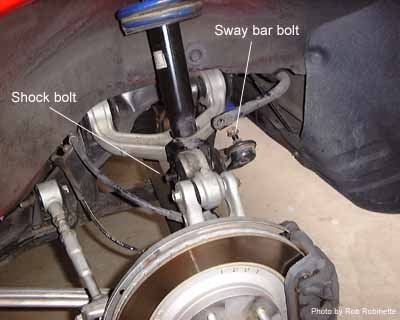
Remove the shock nut and bolt and antiroll bar nut and bolt
Remove the rear tire. Remove the 14mm nut on the antiroll bar, the nut
is on the other side of the bar. (see photo) Remove the 17mm nut on the bottom of the
shock. Mine were seized up pretty good. I had to squirt and soak them with Liquid Wrench
to break them loose even with a 1/2 inch impact wrench @ 120 psi. I alternated between
loosen, then a short shot with the impact wrench set on tighten and then hit it hard on
loosen. On the right rear I had to use a big 1/2 inch breaker bar and tap it with a hammer
a few times (I even stood on the wrench handle to no avail). After continued assaults with
the impact wrench the nuts finally gave in. Rotate the bolt to pull it lose from the
antiroll bar (see photo) and remove it. You may need to lift the wheel hub a little to make the
removal easier.
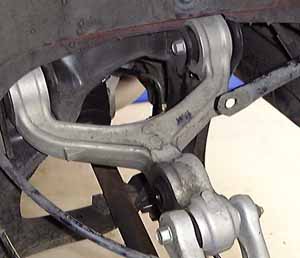
Shock removed
Now the shock is ready to come out. Lift the shock over the bump in
the control arm and lower it out of the fender well. Remove the white plastic isolator
"washer" from the shock spring cap.
Loosen the 14mm nut on the top of the shock a couple of turns BUT DO
NOT REMOVE IT YET!
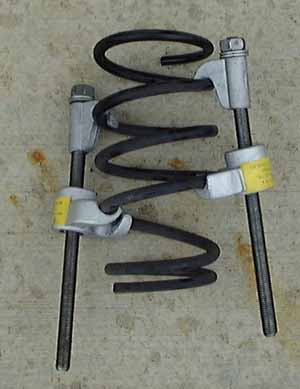
Spring with spring compressors
Warning
The coil springs have a considerable amount of energy stored in
them, do not under any circumstances remove the spring cap without first compressing the
springs. If you don't use spring compressors the cap nut will fly off at high speed in one
direction, the shock will go in the other direction and the tip of the shaft will strip as
the nut flies off. After-market springs may be short enough that they don't need to be
compressed but the stock springs need a compressor.
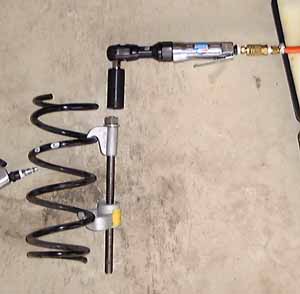
The easy way to tighten the spring
compressors
Put two spring compressors on the spring and tighten them down.
Carefully remove the cap nut, keep your fingers clear of the cap nut and spring and wear
safety glasses. If there is any resistance to remove the nut when you get down to the last
few threads then the spring compressors should be tightened up until the nut will turn by
hand-but use a wrench just to be safe. Separate the shock from the spring and take the
spring cap off the spring.
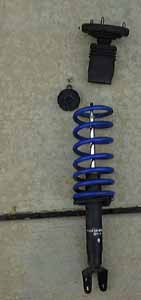
Shock and spring assembly
Get the replacement spring, the rear springs are larger in diameter
than the fronts and the small end of the spring goes on the shock, the large end goes on
the spring cap. Put the shock together to see if you need the spring compressors or not.
With shorter lowering springs they may fit without being compressed. When you put the
shocks together remember the labeled side of the shock faces the middle of the car and you
need one of the three pointed bolts on the top of the shock cap facing the center of the
car-look at the shock tower to see what I mean-make the holes line up. The bottom of the
spring needs to line up to the indentation on the shock, the shock cap really doesn't have
to be lined up with the spring. If you need to, put the spring compressors on and tighten
them down. Place the spring on the shock, the shock cap on the shock shaft, then the large
rubber cap, the metal spacer, and finally the 14mm cap nut. Tighten the cap nut.
Put the large white plastic isolator "washer" back on, get
a 14mm nut ready near the shock tower, put the shock up into the fender well, poke its
three pointed bolts through the shock tower holes, make sure the rubber "donut"
is lined up so the shock shaft will go through it and put a 14mm nut on one of the pointed
bolts to hold the shock-but don't tighten it yet. Lift the shock while you push down on
the wheel hub to get the shock over the hump in the control arm. To line up the bottom of
the shock with its bushing you may need to twist it while you lift the wheel hub a
little-all this while you insert the bolt (I used my legs to lift the hub, twisted the
shock with one hand and inserted the bolt with the other. Rotate the bolt and insert the
antiroll bar bolt into the antiroll bar. Install the 14mm antiroll bar nut and 17mm shock nut but
don't tighten them yet. Install and tighten the four 14mm nuts on top of the shock and
replace the shock tower cover. Tighten the antiroll bar nut and shock nut.
Torque Values for Rear Shocks Inner (lower) shock
cap nut 12-17 foot pounds; outer (upper) shock cap nut 24-33 ft lbs; shock tower bolts
(three) 34-46 ft lbs; lower shock nut 69-81 ft lbs; antiroll bar nut 40-56 ft lbs.
Front Shocks & Springs
Remove the 12mm bolt from the ABS sensor. Remove the sensor by
gently twisting it with your fingers--it will slide out. Remove the two 12mm bolts holding
the ABS sensor line bracket to the upper A arm. Carefully place the ABS sensor away from
the shock to get it out of the way.
Remove the spring clip from the brake line mount on the shock. It
comes out easily if you tap it with a hammer and screwdriver from below, or use pliers.
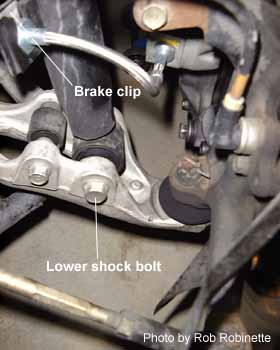
Front shock lower bolt and brake
line clip
Remove the 17mm nut and bolt on the bottom of the shock. An impact
wrench comes in handy here. I had to use a rubber mallet and a large screwdriver to knock
the shock out of its lower mount. Be careful, don't damage the shock.
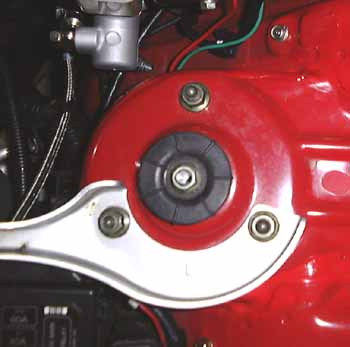
Front shock tower
Pull off the small rubber shock tower cap by hand to expose the
outer shock cap nut. Remove all four 14mm nuts on the shock tower.
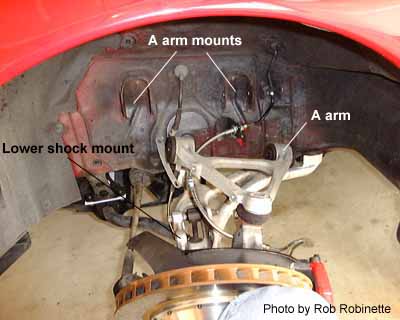
Removing two of the three A arm
bolts
Remove the two 14mm nuts and bolts from the upper A arm fender well
mounts. Pull the upper A arm out of its mount and toward you a little, lower the shock and
tip the top of the shock toward you to clear the fender then lift it out. Put the A arm
back in its mount temporarily (don't let the wheel hub just hang).
Loosen the 14mm nut on the top of the shock a couple of turns BUT DO
NOT REMOVE IT YET!
Warning
The coil springs have a considerable amount of energy stored in
them, do not under any circumstances remove the spring cap without first compressing the
springs. If you don't use spring compressors the cap nut will fly off at high speed in one
direction, the shock will go in the other direction and the tip of the shaft will strip as
the nut flies off. After-market springs may be short enough that they don't need to be
compressed but the stock springs need a compressor.
Follow the directions in the Rear Shocks section to disassemble and
reassemble the shocks and springs.
Reverse the disassembly instructions to put the shock back in. Use
Lock-Tite on the nuts and bolts and torque them to spec-see below for torque values (you
don't want them falling off).
Torque Values for Front Shocks Lower shock nut
69-86 foot pounds; A arm nuts 44-54 ft lbs; inner (lower) shock cap nut 12-17 ft lbs;
outer (upper) shock cap nut 24-33 ft lbs; shock tower bolts (three) 34-46 ft lbs; ABS
sensor bolt 12-16 ft lbs; ABS sensor wire bracket bolts 12-16 ft lbs.
The brake line will only fit in its mount one way, it has one corner
of its hex nut rounded off. The mount is rounded in the same way. Fully insert the line
and slide on the brake line clip.
Enjoy your new suspension.
Rob Robinette
|