Home ] Up ]

How to Eliminate the Coolant Air Separation Tank (AST)

By Rob Robinette

The small black plastic air separation tank bolted to your intercooler has a habit of cracking and dumping all your coolant all over the engine compartment at the most inopportune time. It also blocks some airflow through the intercooler and allows some coolant to bypass the radiator. The tank's purpose is to remove air bubbles in the coolant system but the 1st and 2nd generation RX-7s don't have one. Someone, in a galaxy far, far away, decided to modify the system to work like the 2nd gen RX-7. It worked. There are many, many people on the RX-7 e-mail list that have done this mod with no ill effects (I did it in 97). If you are too squeamish to do this mod you can get an after-market aluminum air separation tank for around $140.
AST Elimination

Here’s how to remove the small black plastic coolant "air separation tank."

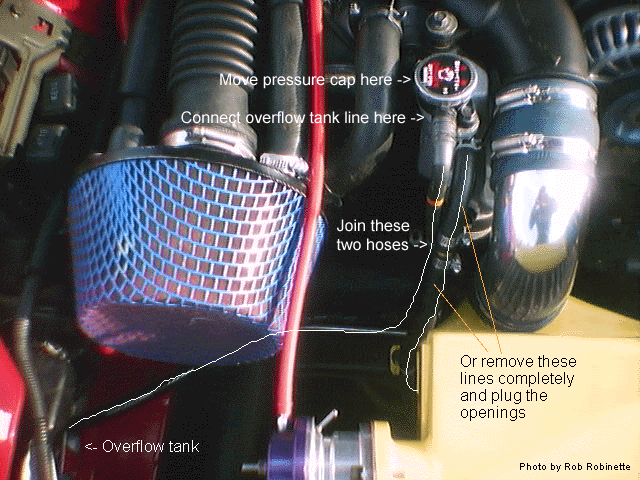
There are two ways to do this mod, you can join the two hoses like in the photo or do it the preferred way developed by Max Cooper by removing the two hoses that flow into the bottom and middle of the AST and then plug the openings with a short piece of coolant line plugged with a bolt. Max had both his  "Help!" brand rubber plugs blow within two months.
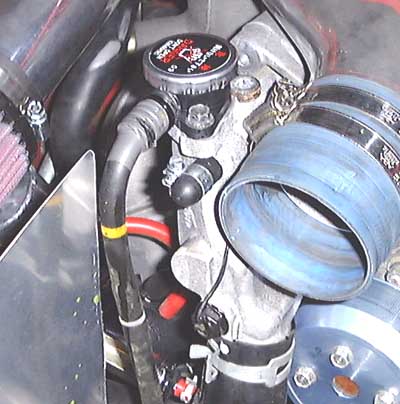
You will need two things to eliminate the tank. First one is the 1986 RX-7 "Radiator Cap Neck" with the overflow tube, part # 15-17YA-N326, $30.20 from Mazdatrix (don’t be confused by the name, the radiator cap neck doesn’t attach to the radiator, it’s the radiator cap located on the engine). You will also need a 3/8" hose coupler and two hose clamps (if you are going to join the hoses). Home Depot and Pep Boys sells a 3/8" "Camel" Hose Repair Kit ($4). It’s in the tool area with the air tool accessories. The part # on the front of the package is 52-465, the number on the back of the package is 657465 A.
The radiator cap neck swap is easy but be careful not to drop the round rubber o ring that will probably come up with the old neck. I dropped it down onto the engine compartment floor pan. I had to pull it loose to find the o ring (I was going to pull the pan anyway to remove the plastic air restrictors in the nose anyway).

Upper hose plugged (these "Help!" brand rubber plugs don't seem to hold up)

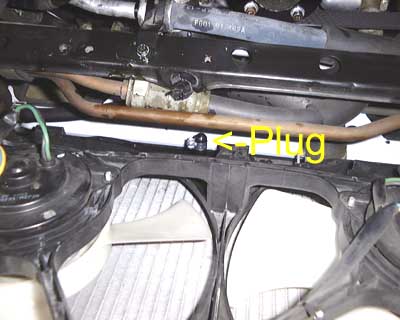
The next step is to join the hose that goes into the bottom of the air separator tank with the one that goes into the middle of the tank (or remove these hoses and plug the two openings, to plug the lower hose you'll have to remove the intercooler). The hose from the bottom of the tank should be routed so that it comes up from the bottom of the radiator to the radiator cap neck that you just swapped out. Bring this bottom hose directly up to the hose that was connected to the middle of the tank, cut them to fit, and couple them together using the 3/8" brass coupler that came in the hose repair kit. Don’t forget to put the hose clamps on before you join the hoses.

If you choose to plug these two lines (see pictures) you can access the bottom hose and nipple by dropping the plastic engine floor pan. Just remove the 2 bolts and 2 plastic plugs on the back edge and the 4 bolts on the side of the pan and it will drop down enough to access the lower radiator nipple. Kevin Kelleher used 2 bolts to plug the two AST tank lines. Get some 3/8" (or 5/16") reinforced hose (fuel line). Get two 3/8' bolts with about ¾ inch of unthreaded shank, and cut this length out of bolt, and stuff in one end of the hoses. Fit on nipples, and use hose clamps, 4 total.

Lower hose plugged

The last step is to connect the air separator tank’s overflow tube to the tube on the new radiator cap neck. This hose goes to the coolant overflow tank (in front of the right front wheel well). Just run the hose where you want it and cut it to fit. I lost about ½ a quart of coolant when I did this mod. I placed a medium sized bowl where the stock air box used to be to catch the fluid. Be sure to top off the coolant when you’re finished. This mod isn’t nearly as complicated as it sounds. Good luck.
Rob Robinette

New Info From Kevin Kelleher

The air-separation tank is in parallel with the radiator. Once the thermostat opens, the hot coolant bypasses the radiator to pass through the tank, and is returned, hot, to the water pump inlet to re-enter the engine housing ports.
It's purpose is first to collect air/vapor in an upper, stagnant chamber. Then by thermal expansion of the fluid and gas, it purges the collected air into the vented overflow bottle by way of a 3rd hose that ends in the bottle below the coolant level. Air bubbles rise to the top and vent to the atmosphere. Upon cooling-contraction, coolant from the bottle is pulled back into the system.
The coolant that flows to the separation tank comes from the top of the thermostat housing, where a mini chamber is cast into the housing. The entry into this chamber can be seen after removing the fill cap as a 10mm hole. The only chamber exit is the hose to the separation tank. The purpose of the mini-chamber is to encourage any air that is passing below, from the open thermostat to the radiator, to rise up and be sent ( with coolant ) through the small bypass line to the separation tank.
Problems With Tank Removal:
IMO, simple removal of the tank and splicing the lines is not recommended for two reasons: First, it provides a bypass to the radiator that is not cooled. But more importantly, it encourages any air that may collect at the top of the housing to be pushed through the engine passages when the thermostat is open. Remember that air collection and movement to the separation tank was the primary function of the mini-chamber at the top of the thermostat housing.
A Simple Fix: Mini-AST
I removed the tank and installed the new cap assembly at the thermostat housing as others have done. But I also plugged the old connections (2) at the nipples and removed the hoses. This eliminated the bypass, and created a modest stagnant chamber at the top of the thermostat housing to purge out air as before with the tank. It appears to work fine, perhaps this will satisfy both pro-tank and anti-tank groups. As a final touch, I may insert an aluminum baffle to help minimize turbulence in the 'new' chamber. With this mod, the original cast mini-chamber traps coolant, so make sure it has some antifreeze for winter climates.
I used bolts to plug the two AST tank lines. Get some 3/8" (or 5/16") reinforced hose (fuel line). Get 3/8 bolt with about ¾ inch of unthreaded shank, and cut this length out of bolt, and stuff in one end of hose. Fit on nipples, and use hose clamps, 4 total.
Kevin Kelleher, 93-Touring

Home ] Up ] Remove Manifold ] Vacuum Hoses ] Turbo System Simplification ] Boost controller ] PRofec Install ] AVC-R Install ] ECU Modification ] PMS Switch ] Disable  Double Throttle ] Remove Throttle Body Coolant ] [ Coolant Tank Elim ] Water Temp Gauge ] Fuel Filter Replace ] Fuel Filter Move ] Release Fuel Pressure ] Fuel Pressure Gauge ] Adjust TPS ] Rebuild Turbo ] Sparkplug Wires ] Flush Radiator ] Water Pump ] Racing Radiator ] Compression Test ] Efini Y Pipe Install ] IC Duct ] Secure Battery ] K&N Air Filters ] Replace Oxygen Sensor ] Remove Air Pump ] Replace EGR ] Disable EGR ] Remove PCV Valve ] Replace Turbo Coolant Lines ] Cold Air Intake ] Nitrous Install ] Other Engine How To's ]