How to Replace the Vacuum Hoses
By Rob Robinette
 < Convert this web page to Palm Pilot Doc format
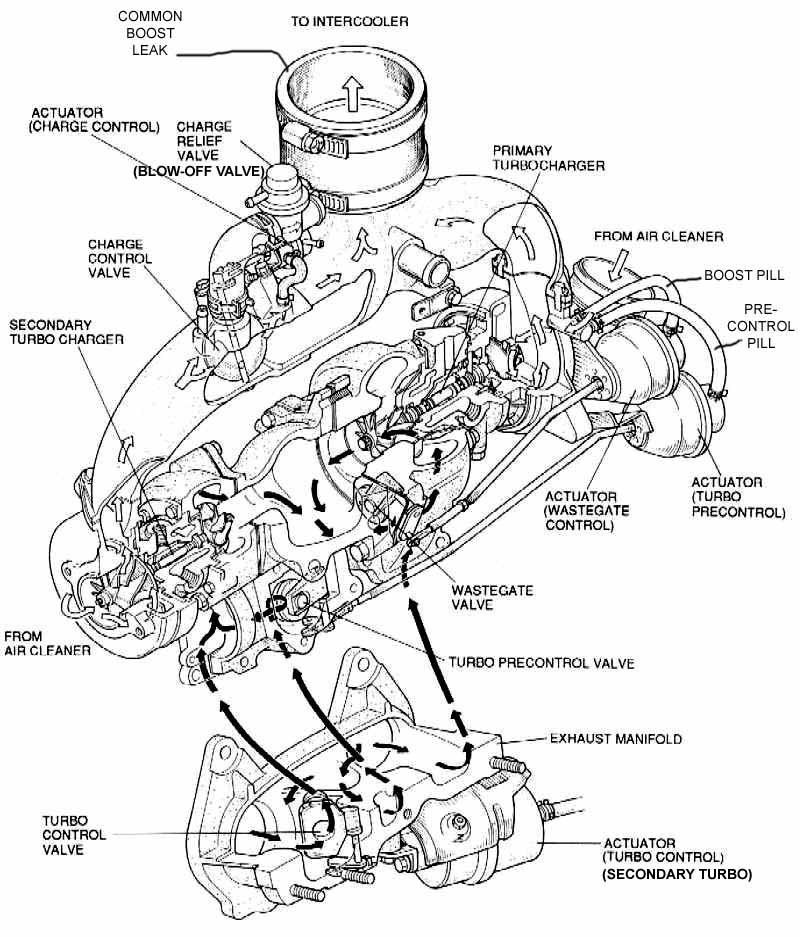
Turbocharger Cutaway - shows hoses
with restrictor pills
First of all realize that this is not easy. I’m an FAA
certified Aircraft Mechanic and I found myself getting frustrated more times than I want
to admit. Plan on spending a couple of days bent over the engine compartment pulling and
installing hard to reach hoses. There are about 60 hoses to replace if you do all of them.
You need at least two sizes of vacuum hoses, 4mm and 6mm. You will need approximately 35
feet of 4mm and about 10 feet of the 6mm and about 120, 4 inch tie-wraps. If you're
planning to install a manual boost controller and a secondary turbo pre-spool controller
you'll need a total of 17 feet of 6mm hose. See the Boost Controller How To. Most
everyone recommends upgrading to silicone hoses and putting 4-inch plastic tie-wraps on
the hose ends. You can also put a little silicone sealant on the pipes that the hoses go
onto (don’t put the sealant in the hoses).
What you're getting into
See the Manifold Removal How To to get the extension manifold off. For the actual replacement of the vacuum
hoses just take your time, remove one hose at a time, size it, cut a replacement, (apply
silicone sealant to the plastic/metal pipe that the tubes slide onto if you want the extra
protection), install the hose, and tie it down using small, 4 inch tie-wraps. I used a
screwdriver to put some light pressure on the hose end as I pulled (gently) and twisted
the old hose to break it lose. I had to cut a few of the hard to reach hoses to get them
off. I cut the end lengthwise at the hose/pipe junction and then pried the old hose off
using a screwdriver inserted into the cut. Be very careful removing the hoses from the
plastic solenoids, they can be very brittle and expensive ($50) to replace. On some of the
tight, 180 degree bend hoses it's best to cut the replacement hoses a little
longer than the stock line to keep the bend from kinking.
From the right side
It usually makes the tie-wrap install easier if you loop it first
and put it on the hose before you attach the second end of the new hose. When you do have
to put the tie-wrap on after both ends of the hose are on you can bend the last inch of
the tie-wrap’s tail so it is easier to loop under and around the hose. Be careful
tightening the tie-wraps. I used needle nose pliers to pull on the tail of the tie-wrap
and used a screwdriver to push on the tie-wrap’s head to counter the pulling. If you
pull the tie-wrap too hard you can break the plastic tubes that the hoses go on. Some of
the solenoids that the hoses attach to are frail and easy to break. Trim off the excess
tail of the tie-wrap with a pair of dykes. Try to cut the hoses with a very sharp pair of
large scissors to get the cleanest cut possible. Craftsman sells a razor sharp cutter that
works great for all type of hose cutting. It has been said that any imperfection in the
hose ends can cause the hose to split later. Be sure to make note of the direction of the
arrow on the check valves that are on 4 of the lines.
There are vacuum hose restrictors in two hoses (on most cars). See the lower left of the Vacuum Hose Diagram for the arrows pointing to the two hoses.
This Turbocharger Cutaway shows the two
hoses too. One is in the wastegate
control hose and the second is in the pressure line that goes from the #1 turbo outlet to
the #2 turbo pre-control actuator. It helps to control the opening of the pre-control
exhaust gate which diverts exhaust going to #1 turbo to the #2 turbo during spool-up. If
it is too large, the #1 turbo boost will be low with a large drop in boost as turbo #2
kicks in. If the restrictor is too small, just the opposite will occur. I recommend you
replace these two restrictors with needle valves. See the Boost Controller How To.
On newer cars and turbos the restrictor pills are replaced by restricted vacuum
line nipples on the primary turbo (where the restricted lines attach to the
turbo). The only way to lower your boost is to "drill out" the
restricted vacuum line nipples.
To get to the last few pesky lines you'll have to remove the
solenoid rack (see below).
When I re-installed the manifold and hooked up the 6 manifold vacuum
hoses I accidentally pulled one of the hoses loose from the non-manifold end. After
getting your manifold back on, re-inspect all of the hoses and make sure they are still
secure. Pay particular attention to where the "double throttle" actuator is
connected, I got it mixed up with one of the other two hoses on the back of the manifold.
Use a small mirror to look at the rear of the manifold where several of the final hose
connections go. I also had a pinched hose below the manifold, take a good look below the
manifold before you bolt it down. This caused my boost to drop after the second turbo came
on line (take a good look at the hose diagram).
Back together
You’ll need to take frequent breaks to keep your back from
locking up because of all the bending over the engine compartment you’ll be doing. I
had the car on jacks for a down pipe installation and it made most of the work easier on
my 6’1" body because I didn’t have to bend over as far. Take your time and
give yourself a couple of days to complete this project. Good luck.
Rob Robinette
Max Cooper's Info on hoses and tie wraps:
Another update...HOSE: ordered some hose from Baker
Precision (http://www.bakerprecision.com/)
and it is not the same stuff that I got from PFS (http://www.pfsupercars.com). The PFS stuff is
still the best by a decent margin, but the Baker stuff is better than the Elite MS (http://www.elitemotorsports.com/)
hose. I have decided to use the Baker hose for my job.
CABLE TIES: I got my Weather Resistant / Heat Stabilized
Nylon 4/6 ties from Web-Tronics (http://www.web-tronics.com). These are pretty
heavy-duty for the job, and are not as easy to work with as the common 4"
miniature ties. However, I think the added longevity makes it worth the
extra effort. These
are up to the task and are dirt cheap. COLOR: I got red hose for my MBM car, and the cable
ties are black. WEB: I will add this new info to the page as soon as I am able,
probably later this week or over the weekend. Here’s the URL for what I’ve got
so far:
Max
Dave Booth Adds
Okay -- here's the last installment of the Great Vacuum Hose Replacement Adventure,
subtitled Pitfalls In What Looks Like A Fun, Easy Project. It's a lot tougher than it
looks. It is a mistake to take this project lightly. Be prepared to have your car off the
road for a while. Also, be prepared to do all the damn hoses, because the two that need
replacing the most are also the most devilish to get at.
Make sure you have plenty of hose -- 30' of the 4mm for sure to do all the small hose
replacements in the engine bay. Subassemblies that need to come off the car to do the
whole job: intercooler intake pipe/throttle body/extension manifold; air control valve (on
the intake manifold below the extension); air pump; alternator; ignition coils in their
mounting tray; and the solenoid rack (have I discouraged you yet?).
The bad news: not removing the solenoid rack leaves four hoses inaccessible.
They are:
* the hose on the back of the pressure regulator control solenoid (the solenoid closest to
the firewall) which dives down, makes a short turn and connects to a pipe on the block.
* a hose that comes off the hard pipe right above the secondary air bypass valve (the
solenoid second-closest to the firewall) which dives down out of sight and connects to a
vacuum actuator below the solenoid rack.
On my car (a '94 with ~39k miles), these first two were rock-hard with no elasticity left
in them at all -- the first stage of Terminal Vacuum Hose Disease. They are a must-replace
item in this job.
The third is a longish 4mm hose run from a hard pipe on the solenoid rack to another
vacuum actuator on the back of the intake manual, wedged right in front of the firewall.
The last one is a 6mm hose that comes off the downward-facing elbow on top of the turbo.
It tucks behind a short water hose and heads back along the top of the engine well below
the solenoids, then turns sharply downward and connects to a pipe on the engine block. The
real trick in this whole process is removing the solenoid rack. It's held
in place by four short Phillips-head screws at the front and three at the back. They are
also secured by a medium-strength Loctite-type material. You will only get one chance to
get these screws out properly. If your screwdriver bit cams out of the screws and strips
the heads you will be one unhappy camper. Use the proper size screwdriver and make sure
that you're putting a lot of pressure DOWN on the screw head as you're turning in order to
prevent cam-out or slipping. I used a regular screwdriver on the front four -- easy
because the alternator was out. On the rear three, I used a 3/8" drive Phillips bit
with a sparkplug ratchet, which allows the handle to gimbal around the drive head. This
allowed me to get the bit straight in relation to the screw heads and angle the ratchet
handle out from under the firewall. Here's the bad news: getting the rear screws back in
is actually harder than getting them out.
Make sure that the short 180-degree runs of hose don't kink on you. Extra hose
length is the solution here; and watch out for a low spot on the underside of the
extension manifold that will pinch a poorly-routed vacuum hose shut when you re-install
it.
Don't get ahead of yourself, do one hose at a time, and make sure you put everything back
nice and snug. You'll be driving down the street grinning like a bandit, knowing you
mastered the most diabolical system on the whole car.
More from Dave Booth
It just seemed like such a dumb idea to
do all this work and then leave 3-4 original rubber hoses in there. I kept thinking about
how long the original vacuum hoses lasted on my '86 -- but there's a lot more room for air
circulation, no turbo heat, and a helluva lot less hoses on that car. And that's what kept
me doggedly pursuing those last three on the '94. I got another ten feet of 4mm hose,
another package of tie-wraps, and added to my tool collection with a 3/8" drive #2
Phillips bit of just the right length to clear the fuel lines on the back of the solenoid
rack. That, combined with my 3/8 spark plug ratchet that allows the handle to sort of
gimbal around the head, let me get all seven screws with nary a slip (which is of course
what strips out the heads).
I have the alternator out, and followed Derek's
suggestion to remove the coils and their heat shield (don't actually have to dismount the
coils of course). I only had to undo about a dozen new hose connections, and of course the
solenoid electrical connections to persuade the whole mess to come out. The fuel lines and
electrical harness do not need to be moved to get the solenoid rack out. The good news is
that I now can plainly see where the 6mm hose that comes off the turbo goes, and the other
two 4mm hoses are quivering in fear, knowing that they're next. I also found a 4mm
silicone hose on one of the rear solenoids kinked shut, having trimmed it to match the
original rubber hose. I'll be going back through and making sure that there's enough
"loop" in all the hoses that are basically making a close 180 to avoid the
dreaded pinched-off syndrome.
Gotta tell you though, fellas, there's absolutely NO
WAY that Tri-Point does all this crap for $500. [Rob Robinette Adds: Actually the
professionals remove the solenoid rack with the hoses intact and replace them on the work
bench. They can get away with doing it that way because they can keep track of where
multiple hoses reconnect.] And if I knew what I was letting myself in for, I have serious
doubts about whether I'd do it again. This ranks right up there on my personal Miserable
Automotive Job List alongside the Jaguar 3.4 intake manifold, the Lotus 907 twin cam
timing, and the 38-year-old Ferrari undercoating removal.
Dave Booth
Andrew Adds
What I learned by doing the job (removing old hoses) is
that what seems to clasp the hoses with a small needle nose pair of pliers with ridges on
it and wiggle the hose, don't pull. If you have a hard time, cut the hose
in half and then splice it open using a Stanley knife, if not even though it is a pain in
the ass, pull the solenoids out and then remove the hose. I found it was much easier to
work if you remove the ignition coil assembly. One more note, when I put back the intake
manifold it pinched a couple of hoses directly underneath, so look out for this.
Andrew
Chris Davis Adds
After reassembling everything on the car I was getting
full boost in both turbos including a nice transition from the primary to the secondary.
The
problem was between 2000 rpm and 4500 rpm I kept getting a loud squeal coming from under
the intake plenum. I narrowed down the noise to the air control valve
(ACV). I removed the intake plenum again but could not find anything wrong with the ACV. I
finally received advice from Dave at Blackstone Performance. I told him my problem and he
told me to open the ACV and check to see if the metal disc had slipped down a little while
I was reinstalling the valve. I loosened the three nuts on the valve and sure enough the
disc was not flush with the intake manifold (I could tell because it left an imprint in
the black carbon build-up). I tried to pull the metal disc up with a screw driver but the
disc kept falling back down. In order to make the disc stay in place, I had to remove the
solenoid rack (again) and pull the valve completely off. Next, I put a little rubber
cement around the disc (from the advice of Dave) to give the piece a little tackiness so
it wouldn't fall off again. After reassembling everything, another sore back, and much
frustration the car runs perfect with no annoying chirps.
I also learned in the process (from Dave) that the ACV
is only active between 2000 and 4500 rpm which is what clued him in to the problem. I can
also remove the intake plenum in about 15 minutes but I hope to never have to remove it
again. Anyway, I just thought you might want to mention something about the ACV disc to
save someone else the headache of having to remove the solenoid rack twice. Once, as you
know, is plenty.
Chris Davis
Source for HKS Vacuum Hoses and Metal Clips
I bought HKS 4mm and 6mm vacuum hose and metal 4mm and
6mm hose clips specially designed for silicone hoses. I ordered them from AXIS Sport
Tuning (714)-991-9500. The hose is blue silicone. The 4mm clamps were 0.40 each, 6mm were
0.50 each. Being all metal clips...they can withstand higher temperature than plastic
tie-raps. They are easily removable and if you need to remove them all you need to do is
squeeze them with needle nose pliers. Also you do not have to risk cutting the hose while
trying to cut the tie-wrap. Once notched... silicone hoses splits very easy.
Zig
More Clip Info
I am sad to say Home Depot no longer carries the small (3/8) clamps for
the 4mm ID vacuum hoses. They have a different one that is cheaply made.
Squeezing the ends together distorts it, resulting in poor fit over the
vacuum hose. The problem is in the squeeze tabs location being almost 180
degrees from each other, where as the old clamps there was only a 60 degree separation
between the squeeze tabs.
KD Rotary has tried to contact the manufacturer only to find out they
discontinued the clamp. They are in negotiations right now trying to reintroduce
them at a substantially lower cost too. In the mean time I had to buy some from
Mazda Comp. I suggest you save the following part number for these 8mm clamps
(for use with 4mm hoses).
part number: 9928-30-800
size: 8mm (3/8) for use with 4mm (ID) vacuum hoses
price: ¢65/ea. ($1.10/ea.from dealer!)
source: Mazda Comp
W.
|